Table of Contents
Creating an Adaptive Curve Track
-
Curve mode is automatically selected at beginning of a recording session. After recording starts, toggle between curve and straight.
|
With this button selected while recording, a line follows machine.
|

|
|
This button creates a straight line between when button was selected until it is switched. Longest segment created can be a distance of 0.8 km (0.5 mi.). For greater distance, line segment does not connect, resulting in a gap in path.
|

|
Example: When approaching and navigating around an obstacle, select straight button. The straight line segment connects points where straight button was selected.
Allows next pass to be propagated without a deviation or gap around obstacle as occurs when recording in curvy mode.
NOTE: Button in use will appear darker.
|
Record/Stop button
|

|
-
Press Record button to begin recording. Record button is used to start and stop recording. Multiple lines can be created in one session.
Curve and straight segment buttons can be switched as needed while recording.
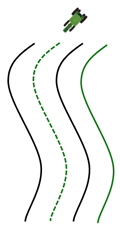
If machine is within black lines and in line with end point of previous recorded line, a line is projected based off previous line as shown below:
|
Recorded Track
|

|
|
0.5 and 1.5 Track Spacing
|

|
|
Projected Track
|

|
|
|
Projected line can be recorded and (or) used to AutoTrac.
-
End Session button saves adaptive curve lines created, or exits without saving if no guidance lines were created.
For desired track, go to Edit Guidance Track and select coordinates tab to add segments after exiting recording session.
When not in a recording session, lines are only available to AutoTrac on and projections based on the previous line are shown.
NOTE: Track spacing for Adaptive Curve Track data is constant. If a different implement width is used when returning to the field, new data must be recorded.